Saturday, November 19, 2011

Happy 1st Birthday Kinley- Pinterest inspired Birthday!

 Sweets bar: Chocolate dipped pretzels, brownie bites, cupcake cones, muddy buddies, lemon bars, banana bread, german chocolate cupcakes, peanut butter button cookies, neiman marcus cookies.

 Fabric Pendent Banner
 Duck taped h2O
 Monthly Birthday Banner made by Kinleys Sweetie. She sells these starting at $50, they are out of chip board can be strung together for album after party. She made one when Kinley was born that says grow.  

 Time Capsule


 Bags Board

 Home made pinata


Thursday, August 25, 2011

Coming SOON!

Oh I love the word FREE!!!!!!! When its FREE, One does not have to ask husbands permission. One does not have to worry about messing it up. One doesn't have to wait until payday. FREE means NOW.

Here are my new FREE finds!
  LOVE my door! Its clean now!

Our almost FREE patio table.

So we have nothing in our backyard, and I have always wanted a magical back yard to "drink chocolate milk and watch the sun go down." Well we are getting there! I discoverd pinterest and am addicted. My world of immitating ideas has grown immensly.

So my mom 'pinned' this. And I fell in love.
 My amazing husband and I drove down alleys and "came across" two pallets. Bryan got the hardware from home depot. 16 "L" brackets, wood screws, and all metal wheels. We could of gotten bigger wheels but we liked the look of all metal ones. I also watered down paint with a cloth and brushed it over the wood. Like a tea stain. I also sanded the edges a bit. I am very please with the turn out, and the fact it only cost us $15.

Here we are waiting for paint to dry!


So here she is!
Now deciding if I need some more of these!

Saturday, July 30, 2011

Marble Nails!!!

What you will need:
Toothpicks
Jar (I used Kinleys old babyfood jars that I save)
Room temp water
2 or more nail polishs
Paper towels
Tape! (Take the time to tape its worth it)

This is my first go at it! I used China Glaze yellow, lime green, purple and pink. My base coat was white. My suggestions: Dip 2 nails at same time, do same color combo and designs and dip in nails the same way.

And here is the tutorial! Marble Nails Video


For more tips on beauty check out: www.polishandpearls.com

Tuesday, July 19, 2011

Before and After: TV Console

What you will need:
 Handy hubby
Dresser
1 can of spray paint
Handsaw
Wood Glue
and a Home Depot!


I hate CORDS. I hate seeing them. Its tacky! Plus if we had the DVD player and cable box on top it left everything off to the side and just looked bad. So I found a craigslist treasure! Got it for $80 buck. Sold our metal piece of crap.


We gutted it. Took the drawers, the drawer track and middle piece out. Got wood from home depot and they cut it out for us. We made the smaller necessary cuts and painted it about 5 times. Probably could of did a better job with the painting part by after 3 days anything would do.


AFTER!!!
Everything is in its place. NOOOOOO CORDS!


The left over drawers will be our new ottoman!

Sunday, June 5, 2011

The AFTERS

Kinley and I. The 1st time I did mine more loose and I liked it much better!

Very loose

Having FUN

The after! I love the loose soft curls. If your hair curls easy use minimal product and make sure hair is about 95% dry.
Last nights BEFORE


ANd my afters! Might touch up a few spots cause I am a perfectionist. But overall I can see myelf doing this 6 times a week!

Saturday, June 4, 2011

When we all sleep...Quick Curls!

My 'getting ready' time use to be 7-8am. Ever since a little girl came into my life it is the LAST thing I do. My hair, if Bryan is working, is in the "mommy bun."

 I hate that I am admitting this...But one day when Bryan was doing some sort of training he got to come home from lunch. He was playing with Kinley and I was watching. I love seeing them together. He suddenly looks at me and says "Well, do you want to go take a shower?!" I was like no I am okay. Then again he says "No really, do you want to go shower?" I say "No I want to spend time with you guys!" Now I swore to him to NEVER and I mean NEVER let me become the "Frumpy Mom" you know that one that is out in Wal-Mart in sweats. Then very sturnly he says "You need to go shower" Haha. Then I realized he was indirectly calling me frumpy! Never again has this sort of situation happened again.

So here is goes! Here I hope is the end to "I have no idea what to do with my hair, and I am tired of the ponytail/ bun!"

I wil post my results as long as.....You share yours ;-)

Here is the link:

http://youtu.be/aYxS1ohz4Ao

And another link from Happy Together one of my favorite bloggers: She has SUPER LONG THICK HAIR!
http://ohsohappytogether.blogspot.com/2011/06/easiest-curls-ever.html?utm_source=feedburner&utm_medium=email&utm_campaign=Feed%3A+blogspot%2FDrmN+%28Happy+Together%29

Saturday, May 14, 2011

Its good to be GREEN! Grocery bags.

So there always has to be a BEFORE picture! So here is K&K
In their previous life they were curtains. FREE, just taking up space in cabinet.
"Boobie" helped too!

The FUN started with just a little paint....
 And some laughs!


 She enjoyed the sound of me hitting the plastic bag underneath.
 Daddy caught her Pink footed!
 But Kinley gave him the look and got away with it..
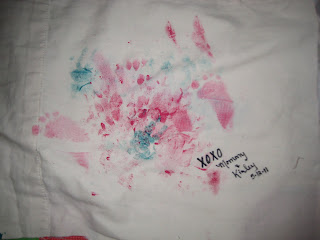
 Her masterpiece...Some of her nuckle prints with a couple feet and a hand or two.

We started out by cutting out 6 squares that were 19x18 inches

We then cute 5x5 inch squares out of what will be the bottom of  the bags.

Then we serged what would be the right and left side of the bags.


I then took corner A&B and pinched them together, this will make a perfect straight stitch. (A is where my thumb is, B is the corner where my knee is) You know if you have the wrong corners if its not straight. 

 Bags still inside out I sewed a stright line. Because the curtains already had a finished edge I used that for the top, less work.
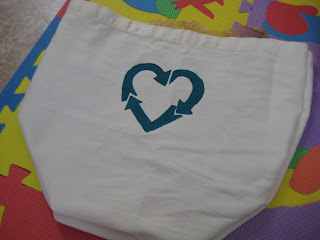
I then made a stencil on my Silhouette SD machine. And placed that over the fabric and used fabric paint to make a design on 4 of the bags. After your design is dry be sure to lay a piece of fabric over and iron to set in paint.

After I cut strips that were 20x5inches and were honestly too thick. So the bags I made gradually have smaller handles.
 Sew them and turn them inside out.
Pin where you want your handles to be.
Place them on right side out side of bag and stitch in a square.


And Repeat!

Kinleys Masterpiece! Definitely my favorite. I tested the size after wards and fits 5 big boxes of cereal in it. GREAT size!

Oh I had ALOT of help. Bryan used his head to show the bottom. Thanks hubs!